


So to me, this makes so much more sense than a New Years Resolution. Wouldn't you rather start a brand new year having already completed your resolution goal? That way, it's like starting fresh with a brand new year, instead of starting the new year in the same predicament you were in the prior year. Does that make sense? Like, wouldn't you rather start a new year as a non-smoker, having kicked the habit during the last months of the prior year? That way, it's a fresh start.
Anyway, my point of all that is, although I have never made a New Years Resolution, this year I'm making an End-Of-The-Year Resolution. Today is Thanksgiving. By Christmas, my goal is to lose 13.5 pounds. That'll take me to a nice even number (I'll tell you what that is when I get there). That's like 3.5 pounds a week. Not impossible. Not easy, either, though, so if you talk to me, ask me how it's going!
Thursday, November 26, 2009
Monday, November 2, 2009
What's Your Cause?
 So what is your cause? Everyone has one. Everyone has something they believe in supporting...whether it's breast cancer research, March of Dimes, helping the homeless...everyone has one thing that just touches their heart. Makes them want to open their wallet. Makes them want to donate their time. We're entering the Season of Giving. Who will you be giving to?
Breast Cancer research is a cause that touches my heart deeply. My mom is in a 14-year battle with this disease. That means I was 12 when she was diagnosed. That means I don't remember much of life without it being a part of it. I've felt the ups and downs, the uncertainty, the fear that this disease brings to all affected by it. That also means that I open my wallet and give my time to help this worthy cause.
However, that's not my cause. That's not what grabs my heartstrings and yanks to the point where I can no longer do nothing. And really, I don't have a cause, I have two. The first is donating blood. I believe every healthy person should be willing to step up and donate, if not on a regular basis at least once in a while. I've watched my mom receive blood transfusions during her fight with the aforementioned disease, and I've seen the immediate effects of that 10 minute, slightly uncomfortable time someone else used to donate their own blood.
But, that's not the cause I wanted to talk about tonight. That's not what is currently on my mind. It's almost Christmastime. And I am so excited for it. The look of my kids opening their presents, the wonder in their eyes as we talk about the magic of Santa, the awe in their voices as I try to explain the real miracle and they question me about baby Jesus and His Father. I love this time of year. But what if you weren't able to give your kids presents? What if you weren't able to provide the big Christmas brunch and the turkey dinner? What if you were barely able to give them a piece of bread to eat and a pair of used tennis shoes to wear when the shoes they have been wearing for years are so worn out and painful to even put on? What's it like to be hungry? More than that, what's it like to watch your children be hungry?
Samaritan's Purse is an organization started by Billy Graham's son, Franklin Graham. It is an international charity that helps many people in many nations throughout the year. My favorite part of Samaritan's Purse, however, is their Operation Christmas Child. Operation Christmas Child is simple, really. It doesn't cost much, and it doesn't take much work. All you have to do is fill a shoe box with gifts for a child in an underprivileged country. Coloring books and crayons. Dolls. Toothbrushes. Candies. Matchbox Cars. Books. Then drop it off during their annual collection week, and it will be sent to a child who needs it. Check out more details here: Operation Christmas Child.
Why is this "my cause", you might ask? Well, let me tell you! When I was 18, I went on a trip to Honduras to help build a medical clinic. When I was there, I was asked to come back and teach at a small school there. So I went home after my week-long trip, told my mom I was moving to Honduras, and just three months later I got on a plane by myself and moved to a third-world country where I knew no one other than the people I met during my one prior week there. It was just after Christmas, 2000. Shortly after arriving there, I assisted a church in an event to help the local children. They told me it was Operation Christmas Child and I'd be handing out presents to children who had never gotten a present in their lives. And from then on, I was hooked. Seeing a child in a tv commercial or in a picture is one thing. Seeing a poor, dirty, malnourished child in person receive their first doll, their first toothbrush, their first piece of chocolate is amazing. And heart-wrenching. And it is so much more so now that I am a mom myself. So I urge you, if you can, take the time and spend the money and help make a moment for a far away child that they will never forget. Check out the website, read the list of approved items, and look up a donation center. Drop-off week this year is Nov. 16-23. You may not get to see the face of that child opening their one and only Christmas present, but try to imagine it.
"Non"-chiladas
When my mom first gave me this recipe, I thought, "Eh, I don't like enchiladas so much." But then I read the recipe, and although it was called enchiladas, they are so not traditional enchiladas. There is no enchilada sauce, which is what I really don't like. In fact, it's a strange combination of things you may not expect in Mexican food. So we've since had a lot of fun thinking up new names for this recipe. I decided to go with Non-chiladas, but we also tossed around Enchilitos (enchiladas + burritos) and more (if you've got a good one, let me know!). Don't let the ingredients gross you out...my family LOVES this recipe. In fact, my 5 year old ate three servings tonight!
Non-chiladas
8 soft taco size flour tortillas or 6 burrito size flour tortillas
1 can cream of chicken soup
1/2 c sour cream (Daisy Light is by far the superior sour cream out there!)
1 c Pace medium picante salsa
2 tsp chili powder
1 lb ground beef, cooked
2 3/4 c shredded cojack or Mexican blend cheese
toppings
Mix together soup, sour cream, salsa, and chili powder.
 Stir 1 1/2 c of the mixture in a separate bowl with the cooked ground beef and 3/4 c of the cheese. Divide the beef mixture among the tortillas.
 Roll up the tortillas and place them seam side down in a 9x13 baking dish.
 Spread the remaining sauce over the top making sure to cover all exposed tortillas so they don't harden in the oven. Cover the top with the rest of the shredded cheese.

Cover the dish and bake at 350 degrees for about 30-40 minutes or until heated through and cheese is melted.
Non-chiladas
8 soft taco size flour tortillas or 6 burrito size flour tortillas
1 can cream of chicken soup
1/2 c sour cream (Daisy Light is by far the superior sour cream out there!)
1 c Pace medium picante salsa
2 tsp chili powder
1 lb ground beef, cooked
2 3/4 c shredded cojack or Mexican blend cheese
toppings
Mix together soup, sour cream, salsa, and chili powder.
 Stir 1 1/2 c of the mixture in a separate bowl with the cooked ground beef and 3/4 c of the cheese. Divide the beef mixture among the tortillas.
 Roll up the tortillas and place them seam side down in a 9x13 baking dish.
 Spread the remaining sauce over the top making sure to cover all exposed tortillas so they don't harden in the oven. Cover the top with the rest of the shredded cheese.
Cover the dish and bake at 350 degrees for about 30-40 minutes or until heated through and cheese is melted.
Sunday, November 1, 2009
My Skin Experiment
I always felt so thankful. I made it through high school, through adolescence, through puberty, being able to count the number of zits I ever had on one hand. People always told me how great my skin was. I didn't wear foundation or concealer; I had no use for it. I barely wore powder.
That all came to a crashing end when I had kids. In fact, that all ended with my first pregnancy, way back in 2003. Women always talk about how great their skin looked while they were pregnant, how they had a "glow". Well, true to my apparent form of having backward medical issues (can we say too LOW cholesterol?), my skin took a crazy turn for the worse when I got pregnant. In addition to acne issues, I also got that lovely "mask of pregnancy". It has never recovered. In fact, it's worse lately than it ever has been and I have no idea why.
So, I took to wearing foundation and concealer to hide it, and I've tried all the products...Proactiv and more. My last step before seeing a dermatologist is to go one week with no makeup on what-so-ever, and going back to the very basic skin care I used as a teenager.
I'm three days into it. The first day was a day I didn't have anywhere to go. The second day, yesterday, I did have places to go. So, I sucked it up, put on some mascara, and left the rest of my face bare. I think this was the first time in my adult life I left the house this way. I felt self-conscious and uncomfortable, but I quickly got over it. And the weirdest thing happened.
I think my least favorite thing about Seattle is the unfriendliness of people. No one says excuse me, no ones makes eye contact and smiles or says hello, no one even waves when you let their car in front of yours. It's very strange. Very very different than when we lived in Oklahoma, and even noticeably different from across the state in Spokane.
However, and maybe it was some random coincidence, but when I took the kids to the grocery store, bare face and all, not one but two people went out of their way to be friendly and chat. Maybe they both happened to be from out of town. Maybe they were both drunk. Who knows, but the only difference I came up with was the fact that I was wearing no makeup. I know, it makes no sense. Whatever.
Anyway, so far my skin for the most part looks and feels good. I still have the one main trouble area and it is not getting any better, though. In fact, it's painful. I'm hoping that in the next 4 days it will clear itself up, but if not, I'm for sure shaking things up and getting a referral to see the dermatologist. Anybody have any other suggestions??!
Spinach Ricotta Manicotti
This is one of my absolute favorite dinners. A go-to recipe. An easy recipe. A recipe that I know my kids will eat, my husband will eat, and no one will complain. I found it on a box of noodles a long time ago while browsing at the store, and bought the noodles simply to try the recipe. It is SO good. It's actually intended to make in jumbo shells, which I did here, but I often use manicotti noodles, so in our house we call it Spinach Ricotta Manicotti.


 16 jumbo shells or 12 manicotti noodles, prepared as directed on package


 16 jumbo shells or 12 manicotti noodles, prepared as directed on package
1 lb frozen chopped spinach (or you could use fresh)
1 Tbsp chopped onion
1 Tbsp olive oil
1 beaten egg
2/3 c Ricotta cheese
1/2 c grated parmesan
1/8 tsp nutmeg
1 recipe of tomato sauce (if not making homemade sauce, I think Prego is the next best thing!)
Thaw the spinach in a pan with a little water. When thawed, drain well, squeezing to remove the excess water. Cook onion in olive oil in a skilled until tender. Add spinach and heat through.
In a bowl, combine cheeses, egg, and nutemg. Stir in the spinach and onion mixture. Pour 1/3 of your sauce in a 9x13 baking dish. Stuff the cooked shells or manicotti with the filling and lay out in the sauce. Cover with the rest of the sauce, being sure to cover the exposed noodles so they don't get hard while baking.
Bake at 350 degrees for 25 minutes.
Wednesday, October 21, 2009
Honey Soy Pork Tenderloin
This is a pork tenderloin. I had never cooked one until today. In fact, I don't think I had ever seen one until I bought this at Trader Joe's a couple days ago. And really, it doesn't look very great.
 But it was!!! And it was so easy. The husband and I practically tripped over each other trying to get seconds. So here's what I did.
Preheat the oven to 325 degrees. Unwrap the pork tenderloin and place it in a roasting pan. When roasting, you always want to place the roast with the fattest side up, so all the juice and flavors from the fat layer permeate the rest of the meat. Salt and pepper the top of the tenderloin. Put it in the oven for 20 minutes.
While the tenderloin is cooking its first 20 minutes, whip up a little sauce. I used 1 Tbsp soy sauce, 2 tsp honey, and 1/2 to 1 tsp Grey Poupon Country Dijon mustard.
 After the first 20 minutes, brush the sauce on the tenderloin and return to the oven. It will take another 15-30 minutes to fully cook, depending on the weight of your meat. Keep brushing the sauce on periodically when you check the meat until the sauce is gone and/or the meat is fully cooked.
Remove from oven and slice!
 I actually made this this afternoon since I had a prior engagement this evening (more on that later), and it was excellent when it came out of the oven and just as good reheated this evening.
Oh, and my pork really wasn't pink inside...it just looks it for some reason in this picture. It was, in fact, very moist and juicy and full of flavor.
**Just to pat myself on the back a little bit - those Trail Mix Muffins I made a few days ago won this week's Paula Deen Get Cookin' challenge! Wo-hoo! Go here to check out Paula Deen's site, her weekly contests, and of course my muffins :)
Tuesday, October 20, 2009
Welcome Back, Old Friend
So I realize that most of this blog has to do with baking and cooking. However, I wanted to let you know that I am now committed to getting myself back in shape. While I don't feel like I need to "lose weight", I do feel like I need to get healthier. As you all know, I quit drinking or consuming all caffeine (except for the little bit contained in chocolate of course). Turns out, the caffeine had been masking a very large iron deficiency, by fooling me into thinking I had energy. Once all the caffeine was gone, it was very evident I had NO energy what-so-ever. After some blood tests and doctors visits, it was revealed that my iron level that should be between 50-100 was 7. And on top of that, I also am lacking in vitamin D and have too low cholesterol. I know, who has these problems? Well, me apparently.
So, after a couple weeks on iron supplements, vitamin D supplements, and fish oil (for the too-low cholesterol), my energy level feels as though it is (very slowly) returning.
My husband has been (not so) subtly telling me I should exercise. And after swallowing my pride (and my anger that Hmpf. How dare he tell me I need to work out!!? Is he calling me fat?!!), I realized that although my energy level is not what it should be yet, and I usually feel like napping instead of moving, exercise could possibly help that, and at the very least it can't hurt.
So, I went back to my old favorite. My tried and true kick-your-butt, get in shape power yoga dvds. And thank God for Baron Baptiste. If you haven't heard of him, or haven't done his workouts, you are totally missing out. I was in the best shape of my life when I did 30-45 minutes of his yoga a day. And so I say, welcome back, old friend!
Monday, October 19, 2009
Honduran Tres Leches Cake
I don't know if this cake is actually Honduran, but the first time I tasted it I lived in Honduras, so it will always be connected in my mind. I had no idea what to expect when I first tried this cake, and was so surprised. It's so different from any other cake I've had, and SO good. Tres leches in Spanish means "three milks", and this cake is definitely full of three milks.
Tres Leches Cake
1 yellow cake mix cake, prepared as directed on box (I used a Betty Crocker yellow cake mix)
1 14 oz can sweetened condensed milk
1 12 oz can evaporated milk
1 c whole milk
1 pint heavy cream
3 Tbsp powdered sugar
Maraschino cherries
Prepare the cake mix as directed (usually with water, oil, and eggs), and bake in a 9x13 pan. Remove from oven, and immediately prick holes in the cake using a toothpick or wooden skewer about every half inch.
 Combine the sweetened condensed milk, evaporated milk, and whole milk in a pitcher, large measuring cup, or anything that is easy to pour out of. Stir it well. Pour the three milks over the cake very slowly, a little at a time, evenly distributing it over the cake. If poured slow enough, the cake will absorb all of the milk.
Cool the cake at room temperature 30 minutes, then cover and refrigerate at least 1 hour. Whip the cream and powdered sugar to stiff peaks and frost the cake. Decorate with maraschino cherries. Store leftovers in refrigerator.
 So good!

I have only made this cake once before, and this was the first time my kids got to have any. they gobbled it up and asked for seconds...they loved it!
Tres Leches Cake
1 yellow cake mix cake, prepared as directed on box (I used a Betty Crocker yellow cake mix)
1 14 oz can sweetened condensed milk
1 12 oz can evaporated milk
1 c whole milk
1 pint heavy cream
3 Tbsp powdered sugar
Maraschino cherries
Prepare the cake mix as directed (usually with water, oil, and eggs), and bake in a 9x13 pan. Remove from oven, and immediately prick holes in the cake using a toothpick or wooden skewer about every half inch.
 Combine the sweetened condensed milk, evaporated milk, and whole milk in a pitcher, large measuring cup, or anything that is easy to pour out of. Stir it well. Pour the three milks over the cake very slowly, a little at a time, evenly distributing it over the cake. If poured slow enough, the cake will absorb all of the milk.
Cool the cake at room temperature 30 minutes, then cover and refrigerate at least 1 hour. Whip the cream and powdered sugar to stiff peaks and frost the cake. Decorate with maraschino cherries. Store leftovers in refrigerator.
 So good!
I have only made this cake once before, and this was the first time my kids got to have any. they gobbled it up and asked for seconds...they loved it!
Sunday, October 18, 2009
Trail Mix Muffins
I changed up my favorite blueberry muffin recipe tonight and made some "Trail Mix Muffins." Except they're not really trail mix-ey. I always think of trail mix as having peanuts and fake m&ms, and I really really don't like trail mix. But, I couldn't come up with a better name, so Trail Mix Muffins it is. I bought some walnut pieces and dried cranberry and pomegrantes the other day, and I thought they would make excellent muffins together. And they do!!
 Trail Mix Muffins
1/2 c butter or margarine
1 1/4 c white sugar
1/2 tsp salt
2 eggs
1 3/4 c flour
2 tsp baking powder
1/2 c buttermilk *
nuts, dried fruit, fresh fruit, or whatever else you like in Trail Mix
2 Tbsp Turbinado sugar
Preheat oven to 375. Spray muffin tin with Pam or other nonstick baking spray (or use paper liners). In a large bowl cream together butter, sugar, and salt. Stir in eggs one at a time. In another bowl, mix flour and baking powder. Stir dry ingredients into egg mixture, alternating with the buttermilk. Stir just until mixed. Fold in nuts/fruits/other items. Fill muffin cups almost to the tops, and sprinkle a little Turbinado sugar on top. Bake approximately 30 minutes or until golden brown.
 * I don't ever have buttermilk and never remember to buy it, so I make my own. To make one cup buttermilk, pour 1 Tbsp white vinegar into a 1 cup measuring cup and fill the rest of the way with regular milk (whole milk preferably).
Monday, October 12, 2009
Peanut Butter Chocolate Buckeyes
As any Ohioan knows, buckeyes are poisonous. But, these ones aren't and they taste incredible! They're a fancy little peanut butter cup that's easy and fun to make, pretty to look at, and yummy!
Peanut Butter Buckeyes
21 oz creamy peanut butter
18 oz powdered sugar
1/3 c melted butter
12 oz semi-sweet chocolate chips
3/4 Tbsp shortening
Mix together peanut butter and melted butter, then mix in the powdered sugar. Refrigerate until firm. Roll refrigerated peanut butter into balls 1/2 - 1 inch in diameter. Return to refrigerator until set up and firm. The colder they are, the easier they are to work with (approx. 2-3 hours at least). Melt chocolate chips and shortening in a double boiler over medium heat, whisking until smooth. Insert a toothpick into balls and dip into chocolate, covering the balls so they look like a buckeye. Put the chocolate covered peanut butter balls on waxed paper and refrigerate until the chocolate has hardened and set.
 These candies look super cute in a little candy dish or crystal bowl,
 or wrapped up to give as gifts!

Peanut Butter Buckeyes
21 oz creamy peanut butter
18 oz powdered sugar
1/3 c melted butter
12 oz semi-sweet chocolate chips
3/4 Tbsp shortening
Mix together peanut butter and melted butter, then mix in the powdered sugar. Refrigerate until firm. Roll refrigerated peanut butter into balls 1/2 - 1 inch in diameter. Return to refrigerator until set up and firm.
The colder they are, the easier they are to work with (approx. 2-3 hours at least). Melt chocolate chips and shortening in a double boiler over medium heat, whisking until smooth. Insert a toothpick into balls and dip into chocolate, covering the balls so they look like a buckeye. Put the chocolate covered peanut butter balls on waxed paper and refrigerate until the chocolate has hardened and set. These candies look super cute in a little candy dish or crystal bowl,
 or wrapped up to give as gifts!
Sunday, October 11, 2009
Strawberry Banana Mini Tarts with Fresh Whipped Cream
You may remember the raspberry mini tarts I made a while ago. I changed it up and did strawberry-banana this time, and they were awesome! I used 40 of the mini phyllo cups (sold in the freezer section). Thaw them (it only takes 10-15 minutes or so), put a small layer of cream cheese on the bottom, and then a small piece of banana and a small piece of strawberry.

 Next you will top with the glace, which will keep the banana from turning brown by keeping it from the air.
 To make homemade whipped cream, I used a stand mixer, but you can use a handheld mixer or even a whisk. Beat on medium the heavy whipping cream (either pasteurized or ultra-pasteurized works fine). When soft peaks start to form, add in 2 Tbsp powdered sugar for every cup of cream you are whipping. Continue beating on medium speed until heavy peaks form. It looks like this.
 I then used a mini-size ice cream scooper to place a scoop of the whipped cream on top of the glace and garnished with another slice of strawberry.
 Here's the glace recipe:
Mashed strawberries to make 1 cup
1/2 banana mashed
1 cup sugar
3 Tbsp corn starch
1/2 cup water
Mix the corn starch and sugar in a saucepan. Slowly mix in the mashed fruit and water. Heat, stirring constantly, over medium heat until the mixture boils and thickens. Boil and stir for one minute. Remove from heat and let cool.
If you have extra whipped cream and don't want to waste it, you can freeze it! Put spoonfuls on waxed paper and place them in the freezer for about an hour until they are frozen. Remove them from the waxed paper and put them into a Ziploc bag. They are good for about 2 weeks, and are great to put on ice cream, in hot chocolate, or on whatever else you want some whipped cream.

Wednesday, October 7, 2009
Fall Favorites - Zucchini Bread
Oh fall baking, how I love you! Today I made one of my favorites from when I was a kid, zucchini bread. I changed up the recipe a little, and the only thing that would have made it even better is if I had had some walnuts to add to the bread, but it was still awesome.
 Zucchini Bread
Zucchini and other squashes are freezable. I have bags of measured shredded zucchini and squash in Ziploc bags in my freezer right now. It makes for a quick way to enjoy a favorite bread or other treat when zucchini is not in season.
 Zucchini Bread
2 c sugar
1 c olive oil
3 eggs
3 c flour
1/4 tsp baking powder
1 tsp soda
1 tsp salt
1 tsp cinnamon
2 c shredded zucchini
1 tsp pure vanilla extract
1 tsp almond extract
1/2 c chopped walnuts (if desired)
Mix all ingredients in the order listed. Bake in two floured and greased loaf pans at 350 degrees for 35-40 minutes.
Quick breads make great gifts, too!
Zucchini and other squashes are freezable. I have bags of measured shredded zucchini and squash in Ziploc bags in my freezer right now. It makes for a quick way to enjoy a favorite bread or other treat when zucchini is not in season.
Tuesday, October 6, 2009
Honey Parmesan Chicken Poppers
I changed up a recipe that I love tonight, just to try something new, and loved it even more! I made honey parmesan chicken poppers, and they were excellent, and a great kid-friendly dinner.
Honey Parmesan Chicken Poppers
1 lb chicken, cubed
2 Tbsp olive oil
1/4 c plain bread crumbs
1/4 c grated parmesan cheese
2 Tbsp honey
1/2 - 1 tsp minced garlic
First heat 1 Tbsp oil in a skillet over medium-high heat. Saute the bread crumbs in the oil until lightly browned. Remove to a medium bowl and mix with the parmesan cheese. Add the second Tbsp oil to the skillet, heat, and add the chicken, honey, and garlic. Cook 6-8 minutes, or until chicken is cooked thoroughly.
 Mix the chicken into the bowl with the bread crumbs and parmesan.
 Perfect as a healthy chicken nugget to serve your kids!
 (The original recipe calls for dijon mustard instead of the honey, which is amazing, but my kids won't eat it that way. Try out both and let me know what you think!)
Monday, October 5, 2009
Super Easy Goat Cheese Honey Bruschetta
It may not sound like it all goes together, but I assure you it tastes awesome. And it is SO EASY!
Goat Cheese Honey Bruschetta
Bruschetta or French bread (I used untoasted French bread)
Chavrie basil and garlic goat cheese
Roma tomatoes, sliced and diced
Fresh basil
Honey
Spread the goat cheese on the bruschetta (or bread). Top with sliced and diced tomatoes, chopped fresh basil, and drizzle with honey. Serve chilled. SO good!!


Friday, October 2, 2009
Halloween...Hooray!
Yes, I know it's only October 2nd. And Halloween isn't until October 31st. But in our house, Halloween is a whole month. I absolutely love it. I love this whole season, as a matter of fact. My oldest girl's birthday is in mid-September, and from planning her party through the end of the year, I so enjoy the baking and the colors and the smells and the sounds and the seasons and the holidays. So today, I started cookie season in our house with some Halloween cut-outs. The recipe I use has been passed down from my grandma to my mom to me. And it's the best. So sshhh. I'll share it with you.
Cut-Out Cookies
3/4 c shortening
1 c sugar
2 eggs
1 tsp vanilla
2 1/2 c flour
1 tsp baking powder
1 tsp salt
Cream shortening and sugar. Mix in eggs and vanilla. In a separate bowl, blend together flour, baking powder, and salt. Stir dry ingredients into sugar mixture.
Chill at least 1 hour.
Roll out 1/4 of the dough at a time, cut, and place on ungreased baking sheet.
Bake until set but not brown (6-8 minutes) at 375 degrees.
I figured I'd start with witches hats, pumpkins, and houses. I just bought some new Halloween cookie cutters (skull, gravestone, and cat) and can't wait to use them, so I'll be making some more cookies soon.
 Let the cookies cool completely, and then frost and decorate.
 I usually use a basic confectioner's sugar icing on these, but this time I used chocolate frosting for the hats and orange fondant for the pumpkins (haven't done the houses yet).
 So, happy Halloween-Season, and welcome to Fall Baking!!!
Thursday, October 1, 2009
Fifty Dollar Food Week - Dinner #3
Today was the husband's birthday, so I dug through the freezer to see what I could come up with. I pulled out some short ribs yesterday to let them thaw and began developing a recipe to use with what I had on hand. I decided to call it Beef Short Ribs di Chianti, and it turned out to be really good!
So here are the ribs. I actually used two packages this size, as there isn't a whole lot of meat once you cut off the fat and bone.
 First thing to do was sprinkle the ribs with salt and pepper and sear them on all sides quickly in about 2 Tbsp oil over med-high heat. Take them out of the pot and put them in a bowl. Then they look like this.
 Cut up some onion and carrot.
 Mix the onion and carrot into the oil and drippings in the pot where you seared the ribs. Cook and stir frequently for about 8 minutes, until the veggies start to get soft. Add garlic, flour (2 Tbsp), basil, and thyme, and stir for one minute. Stir in 2 cups of Chianti red wine and two cups of beef broth; stir and bring to a boil over high heat. Add a can of diced tomatoes with the juice and a bay leaf.
 Pour the sauce over the ribs in a 9x13 pan (all my sauce didn't fit in the pan - just make sure the ribs are covered). Cover the pan with foil tightly and put it in an oven at 325 degrees for about 2 hours. Turn heat up to 350 and cook for another 15 minutes or so.
I also made some more of the same soft boiled potatoes with butter, salt, garlic powder, basil, and thme, and these noodles courtesy of Pasta Roni, which are a huge hit in our house every time I make them.
 It was all VERY good...I highly recommend this rib recipe!

 It was all VERY good...I highly recommend this rib recipe!
Wednesday, September 30, 2009
The Three Little Bears
We ran out of bread. I only had one package of yeast left. One package of yeast is enough to make one loaf of bread, but I felt like trying something different. Instead of bread braids, like I usually do when I want something different, I thought I'd try bread bears. Not so useful to make, say, a sandwich, but oh so cute! You could do this with any kind of bread dough, even store bought frozen dough if you're not keen to make it yourself but still want some cute little edible bears. You could do cinnamon-raisin bread with raisin eyes (my oldest doesn't like cinnamon and I don't like raisins, so it wouldn't go over so well here). You could do chocolate chips. Oh I have so many ideas! In fact, you could do any other animal you want. How fun!
Anyway, I just used Betty Crocker's basic crusty white bread recipe again, except I made half the recipe since I had just one package of yeast. This made three bears.
And as I said before, one of my favorite things is punching down the dough. And no, my sweater sleeve is not touching the dough, although it does look like it in the picture. And no, that's not a mole on my finger...it's food coloring from an earlier baking project today that I'm hoping to share with you tomorrow.
 After punching down the dough, you can shape your bears. Or pigs. Or elephants. Or whatever your little heart desires. Ooh, you could even make hearts!
 The bears then have to sit in a warm spot and double in size...about 30 minutes.
Oh, and by the way, we ate Dinner #3 of our Fifty Dollar Food Week tonight, but it was just leftovers, so no new pictures. I'll have some tomorrow, though; tomorrow is hubby's birthday, so I'm making a good one!
Anyway, I just used Betty Crocker's basic crusty white bread recipe again, except I made half the recipe since I had just one package of yeast. This made three bears.
And as I said before, one of my favorite things is punching down the dough. And no, my sweater sleeve is not touching the dough, although it does look like it in the picture. And no, that's not a mole on my finger...it's food coloring from an earlier baking project today that I'm hoping to share with you tomorrow.
 After punching down the dough, you can shape your bears. Or pigs. Or elephants. Or whatever your little heart desires. Ooh, you could even make hearts!
 The bears then have to sit in a warm spot and double in size...about 30 minutes.
I then baked them at 375 degrees for about 25 minutes, took them out, drew eyes with a food marker, and voila! Three little bears!
 So cute! Be careful when shaping the bears though...all the cracks that show in the dough show ten-fold after it's baked.
 Add a honey bear, and you have a cute breakfast for your cubs.

 So cute! Be careful when shaping the bears though...all the cracks that show in the dough show ten-fold after it's baked.
 Add a honey bear, and you have a cute breakfast for your cubs.
Oh, and by the way, we ate Dinner #3 of our Fifty Dollar Food Week tonight, but it was just leftovers, so no new pictures. I'll have some tomorrow, though; tomorrow is hubby's birthday, so I'm making a good one!
Tuesday, September 29, 2009
Fifty Dollar Food Week - Dinner #2
So, on the menu tonight was Rock Cornish Game Hens, herb garlic potatoes, and farmer's market fresh corn on the cob. If you've never made game hens, they're really very good! You can stuff them like you would a turkey, but I usually don't. I only buy them when they are on sale, though, since they go on sale so often, so I had a few left in my freezer. Two hens feed my family of four.
The first thing I did this afternoon was pull out my basil. I like to buy fresh basil at the farmer's market, or at the grocery store if it's off-season. It's really very inexpensive. The best way to store fresh basil for any length of time is simply in a Ziploc bag in the freezer. When you need some, all you have to do is pull it out, break off a few leaves, and then chop them up.
 Next, I took my thawed game hens, ran them under cold water to rinse the leftover juice and whatever else off the outside and the inside, and then patted them dry with a paper towel.
Kind of looks like a little headless chicken baby, doesn't it!?
 I mixed my chopped basil with some olive oil and lemon pepper and brushed it on the hens.
Ooh, look!! Twins ;)
 I shucked some corn on the cob, peeled some potatoes, and left those to wait until about 20 minutes before the hens were done.
 To cook the hens:
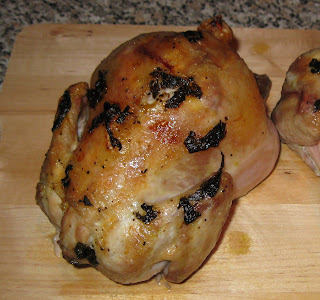 I soft boiled the potatoes tonight, melted a little butter over the tops, and then seasoned them with some sea salt, thyme, garlic powder, and basil. They were VERY good! Nothing beats a good Idaho potato.
 As I said before, I happen to have a lot of meat in the freezer right now. There's no way I could be making these dishes on $50 a week if I had to purchase all the meat too. I do try to stock up when freeze-able things are on sale, like the game hens, chicken, and sometimes even salmon or other fish. As soon as the meat from our cow runs out, I will be back to buying beef at the grocery store for a little while, and that will drain my budget quickly.
 I shucked some corn on the cob, peeled some potatoes, and left those to wait until about 20 minutes before the hens were done.
 To cook the hens:
Preheat oven to 350 degrees.
Put the hens on a rack in a baking or roasting pan and place in the oven breast side up.
Two hens usually take around 1 hr 15 mins. When you have 15 minutes left on the timer, crank the heat up to 400 and the skin will brown and crisp nicely.
 I soft boiled the potatoes tonight, melted a little butter over the tops, and then seasoned them with some sea salt, thyme, garlic powder, and basil. They were VERY good! Nothing beats a good Idaho potato.
 As I said before, I happen to have a lot of meat in the freezer right now. There's no way I could be making these dishes on $50 a week if I had to purchase all the meat too. I do try to stock up when freeze-able things are on sale, like the game hens, chicken, and sometimes even salmon or other fish. As soon as the meat from our cow runs out, I will be back to buying beef at the grocery store for a little while, and that will drain my budget quickly.
Subscribe to:
Posts (Atom)

